Stratum 1 Raspberry Pi Time Server
2020-04-12
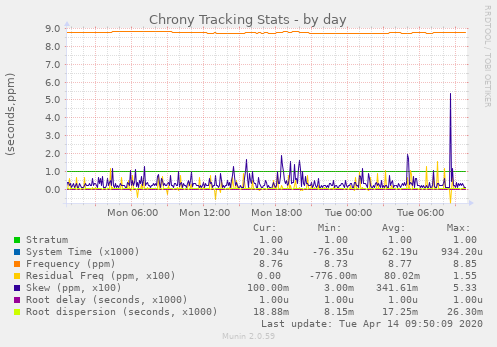
simple munin metrics
One could say they serve no real purpose, as my little Ubiquiti router can actually do the majority of what I run on these two micro space heaters.
Their real purpose is to scratch an itch at a very low price point
Currently, infra-1 and infra-2 are:
- Kea DHCP Servers, in load balancing HA mode
- PXE Boot (iPXE)
- Bind9 servers. My internal home network is called home.michaelc.dev. I also occasionally set youtube.com to an invalid address so I can get Owen off of it for a while.
- OpenLDAP Servers. This honestly only serves me.
- NTP Servers
I got kind of bored and stir crazy after being home so much. Between my hernia repair and Covid19, I have been home bound since January. So, I decided to order something that has been on my wishlist for a while now
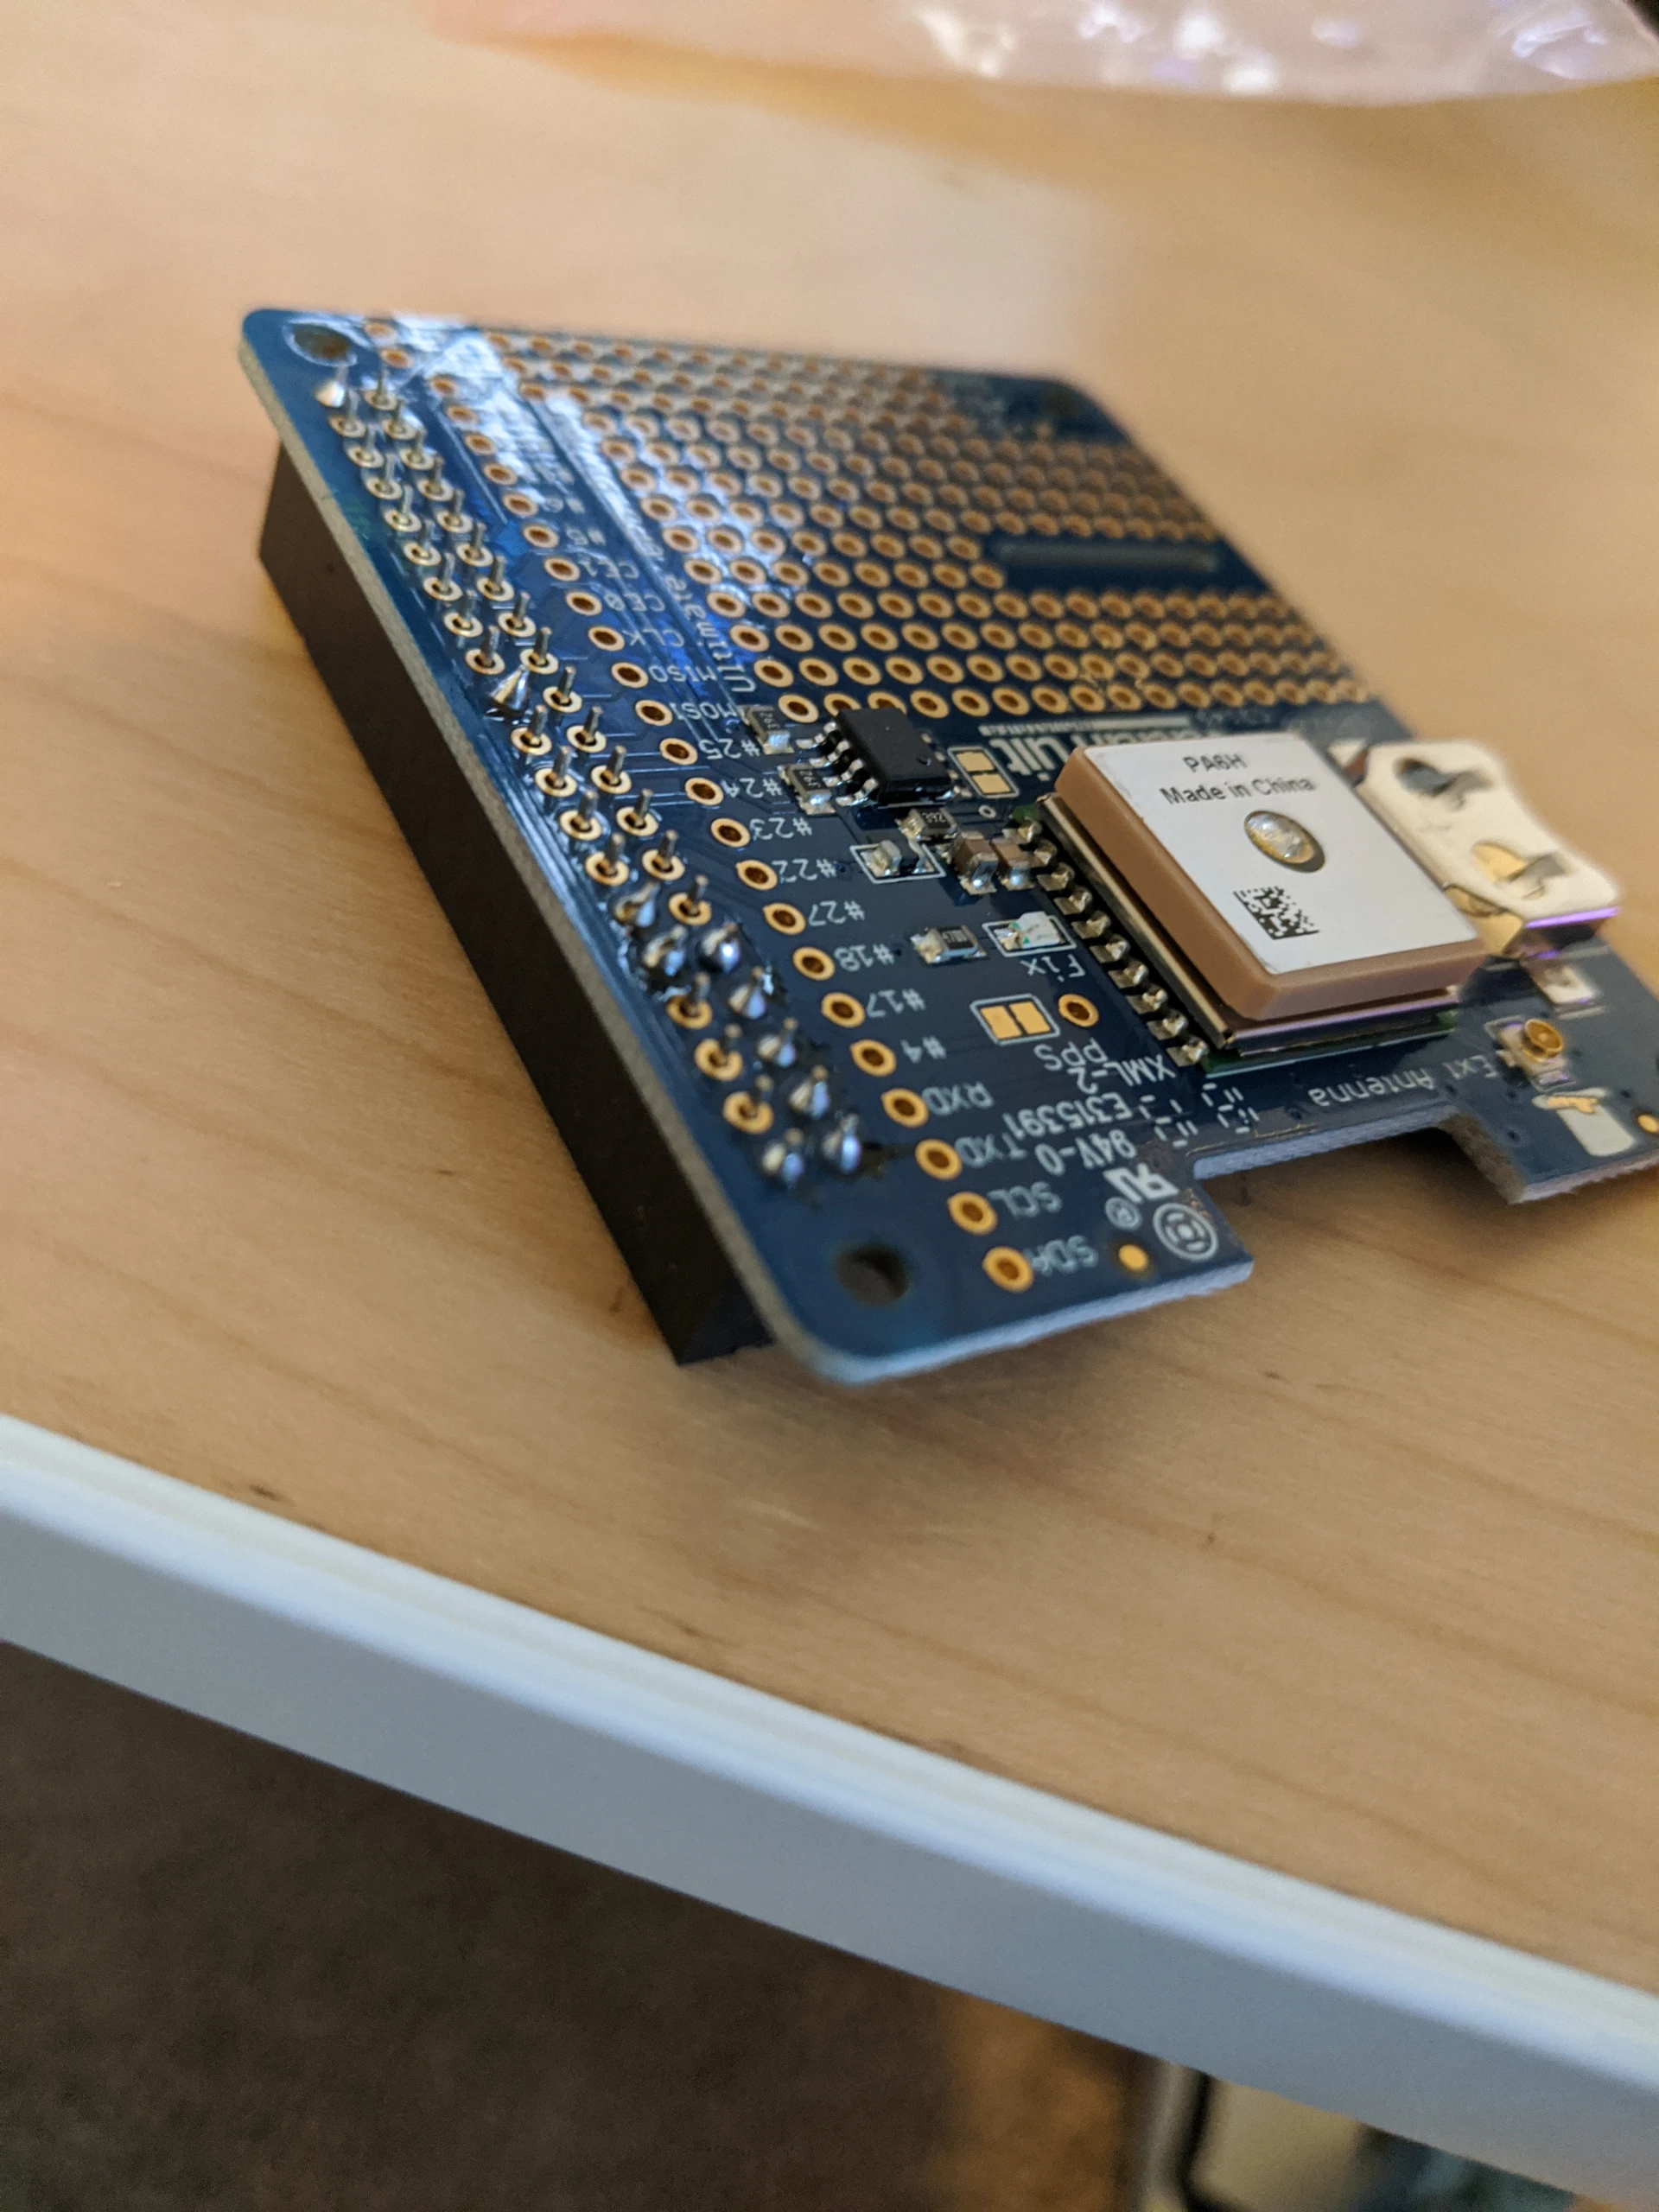
The Adafruit Ultimate GPS Hat!
This is a really neat device. The GPS uses the Raspberry Pi’s GPIO serial console, and then also generates a Pulse Per Second signal on pin4.
Time servers can use this GPS information and PPS as a source of time, a very accurate one at that.
NTP and GPS
There are a some acronyms associated with this project, so lets clear them all up:
- GPS: Global Positioning System
- NTP: Network Time Protocol
- NMEA: National Marine Electronics Association
- PPS: Pulse Per-Second Signal
NTP Stratums
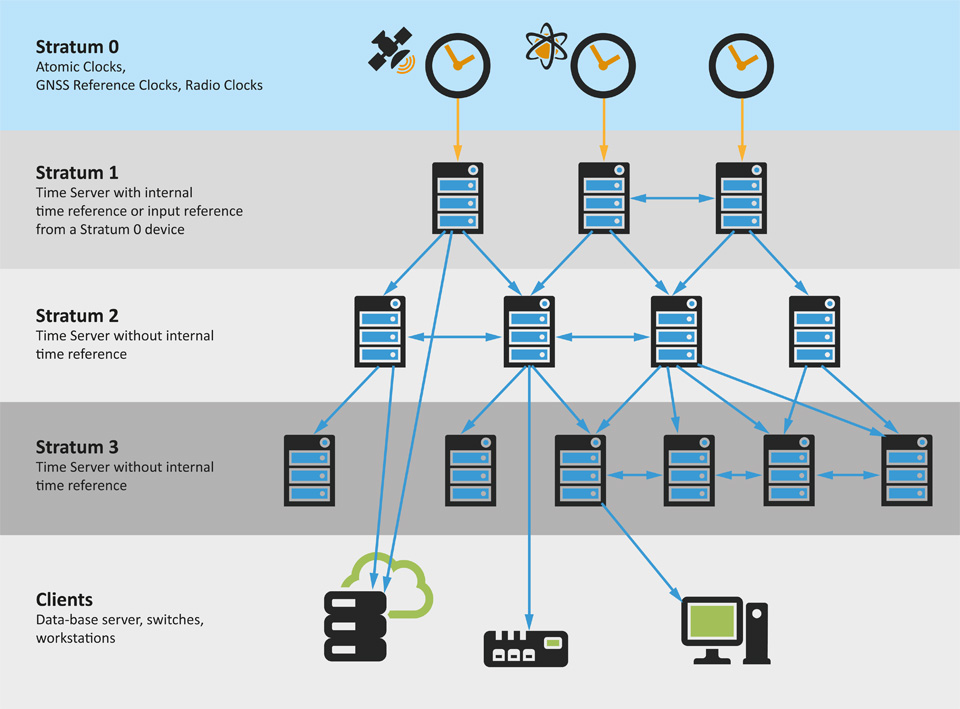
Statum Levels
So unless I can secure a source of Caesium, I will not be able to be a stratum 0 time source. Level 1 is what I can accomplish.
Hardware Setup
I purchased the antenna and pin header, so I only had to do a little bit of soldering
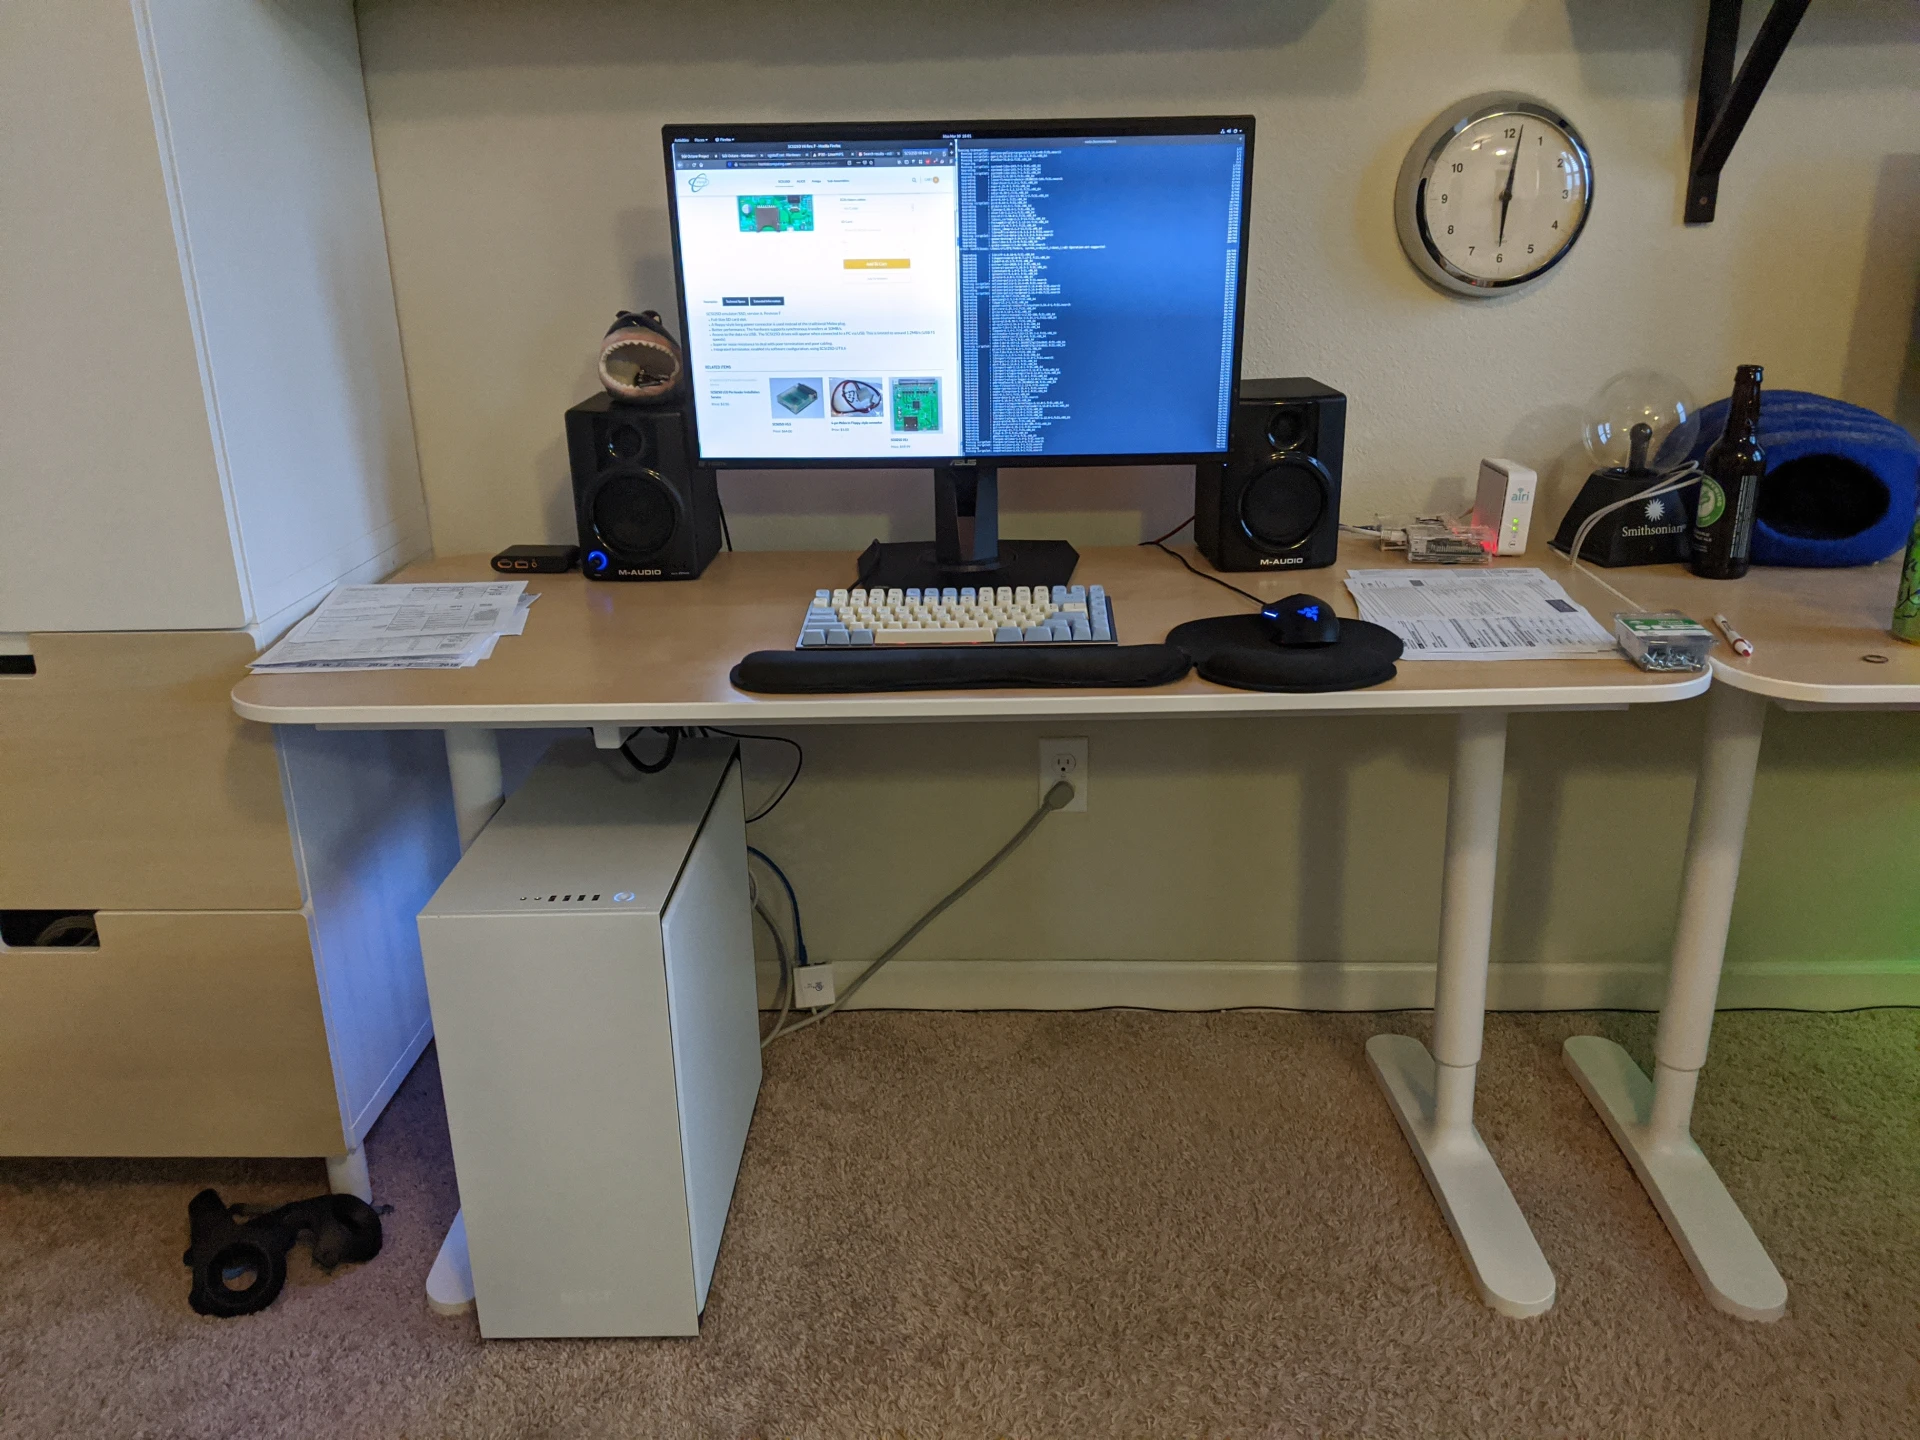
Completely unrelated photo. I cleaned up my wire jungle, I was super happy with this
My little helping hands were useful. I soldering a few joints on each end while clipping it down. This ensured the pin header was even and flush with the pcb
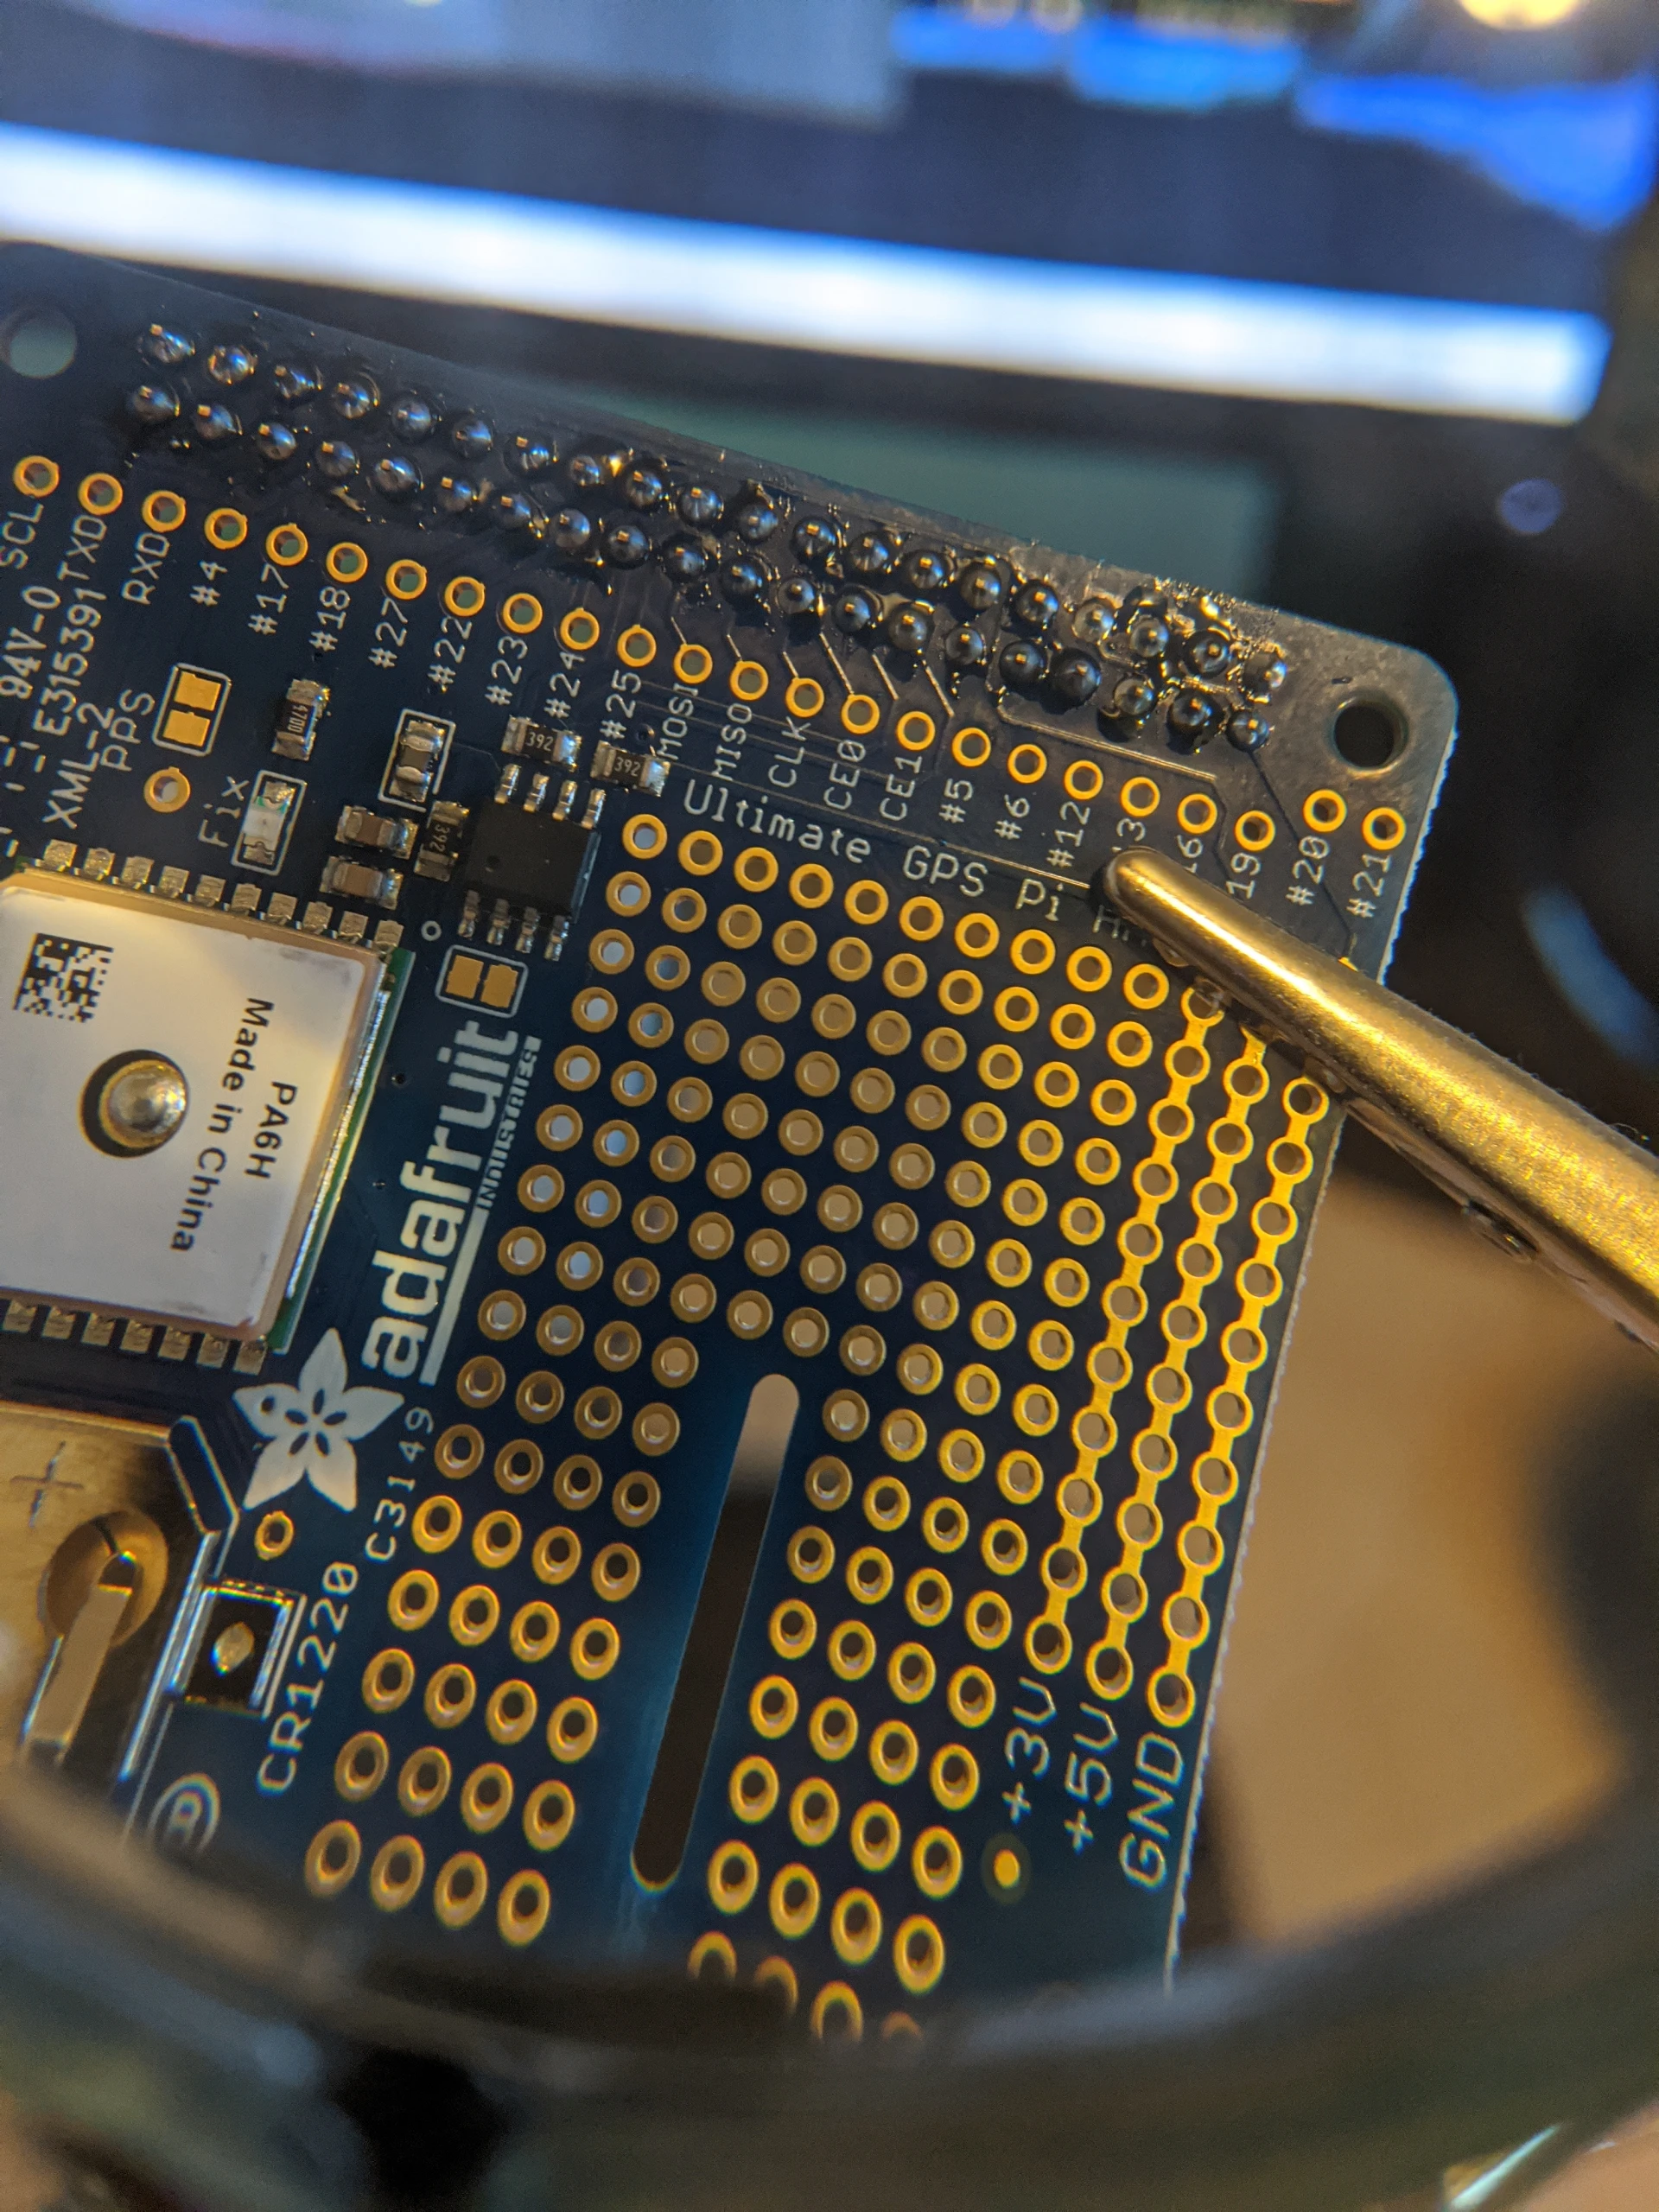
There, just a bunch of messy flux and not the worlds best solder job
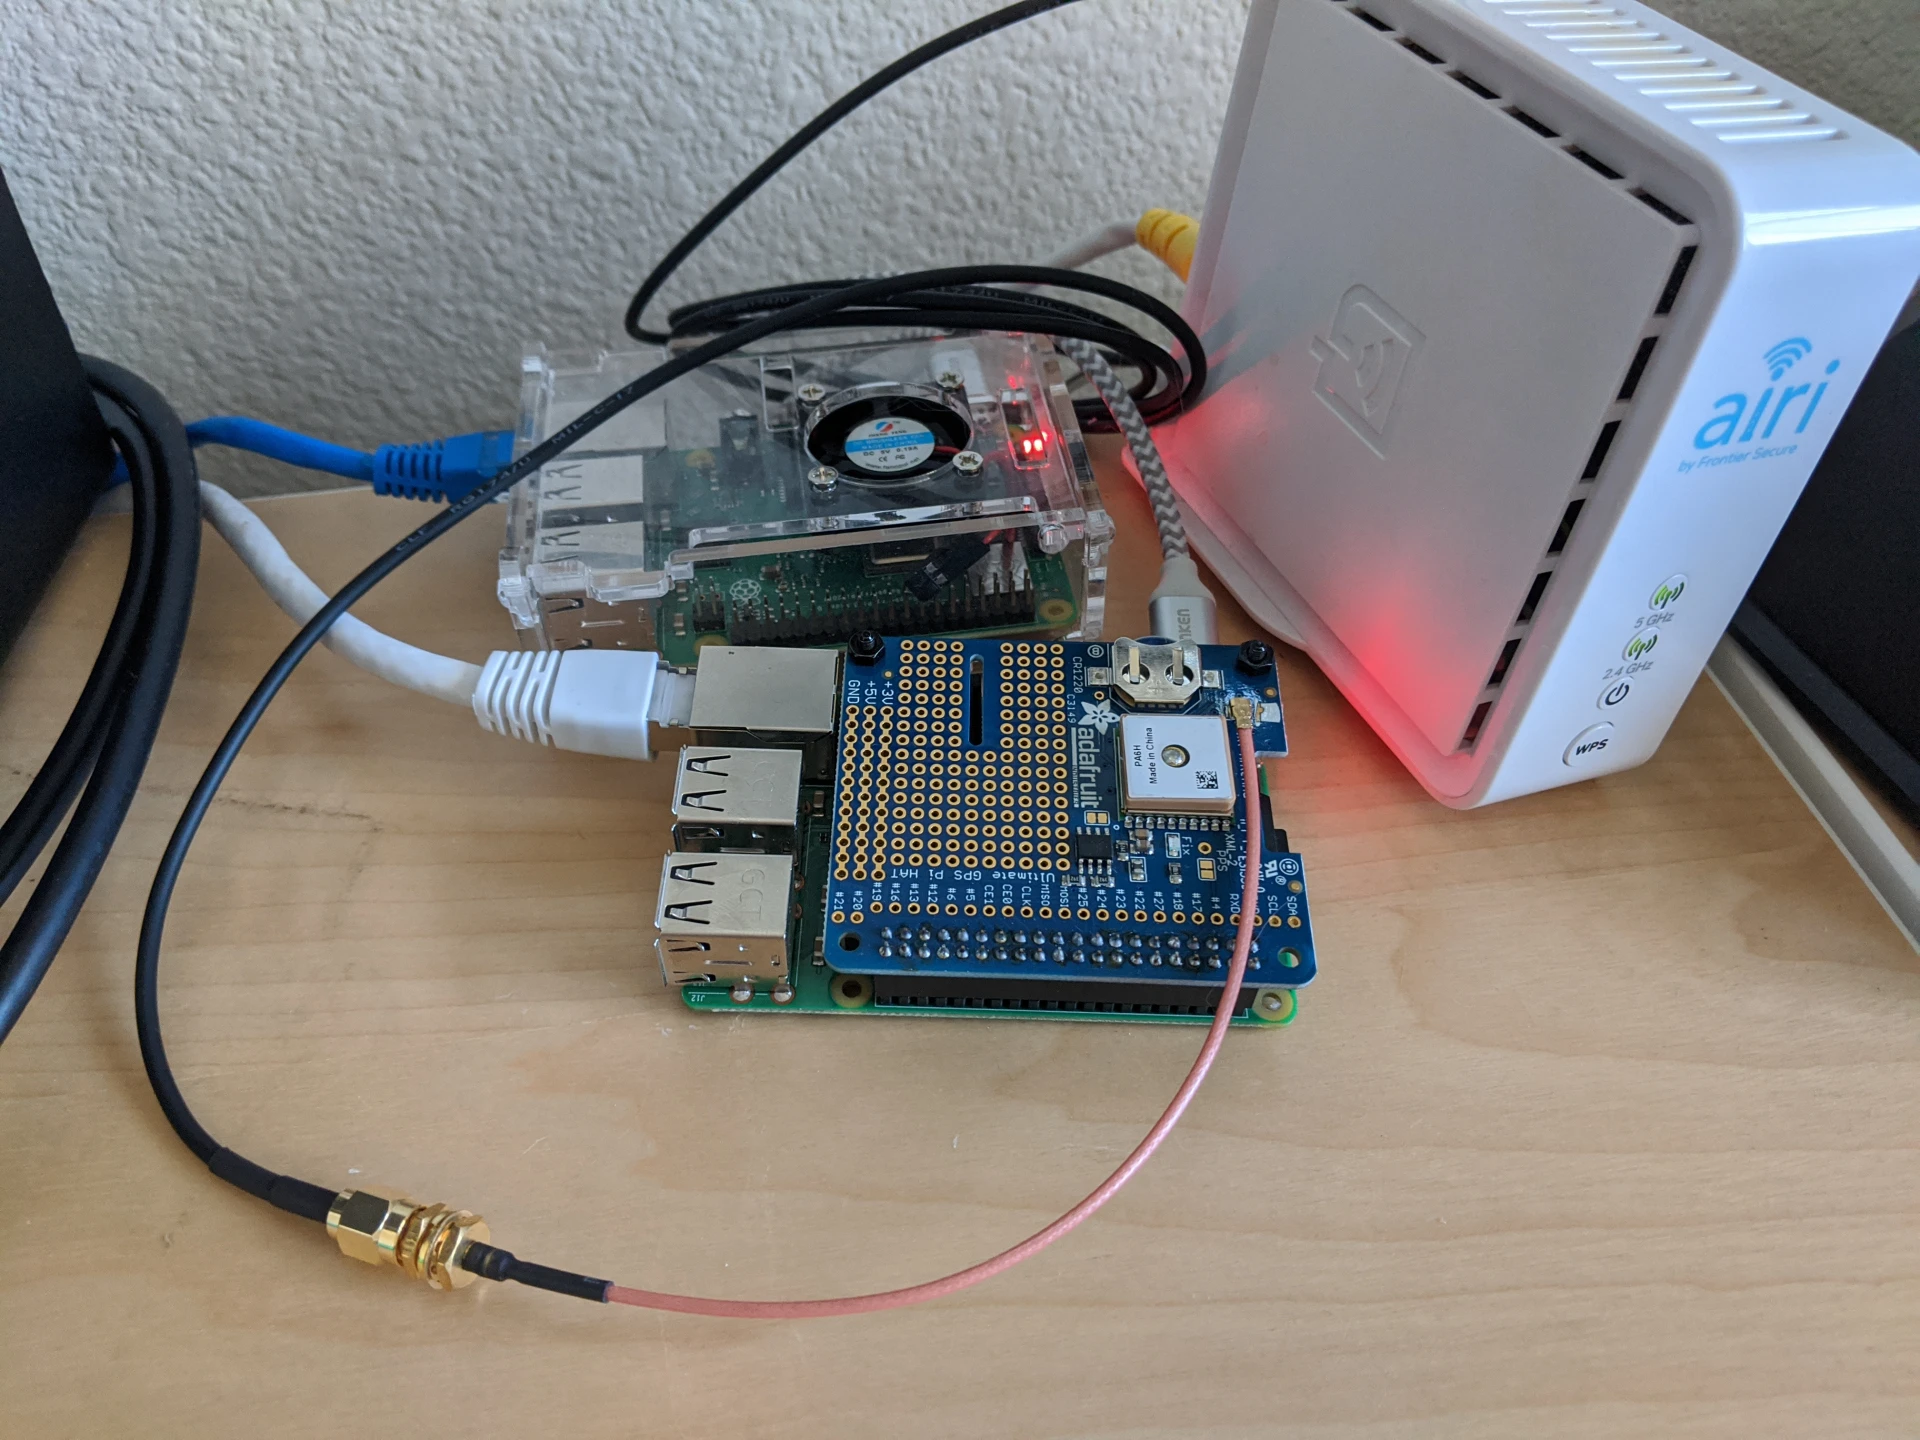
So, my little cheap plexiglass case cracked when I was taking it off to add the GHPS hat. So, it is as naked as a babe until I can get a new one
Also, I bought a few CR1220 batteries. This will allow the GPS hat to use a hardware clock, which will help syncronization happen faster.
Rasbian Setup
Since all of the tutorials on using this GPS hat with a Rasberry Pi are geared towards Linux, I imaged a new SD card with Raspbian so I could get the gist of how all of this worked.
I followed the guide written by Adafruit.
First off, and do this before you even install the GPS hat, is to disable the serial console in u-boot by removing “serial” in console definition:
$ cat /boot/cmdline.txtconsole=tty1 root=PARTUUID=738a4d67-02 rootfstype=ext4 elevator=deadline fsck.repair=yes rootwaitIf you do not do this, u-boot will interpret the gps data as a TTY input, and halt the boot process. This means you need to have a monitor and keyboard plugged in.
Next, we need to configured how the system interacts with the GPIO. We want to add the device tree overlay to disable bluetooth, so the GPS can use the high speed uart. We also need to define the pps device as GPIO pin 4, enable “turbo” mode, and set the uart to 9600
$ cat /boot/config.txtdtparam=spi=on
dtoverlay=pi3.disable-bt-overlay
dtparam=audio=on
[pi4]
dtoverlay=vc4-fkms-v3d
max_framebuffers=2
[all]
enable_uart=1
force_turbo=1
init_uart_baud=9600
arm_freq=800
dtoverlay=pps-gpio,gpiopin=4From there you can power off your pi, and attach the GPS hat.
Once up and running, disable the login service on the serial device:
systemctl stop serial-getty@ttyS0.service
systemctl disable serial-getty@ttyS0.servicestty -F /dev/serial0 raw 9600 cs8 clocal -cstopbYou can now cat /dev/serial0 and you’ll see GPS data:
$GPGGA,052731.000,3343.3943,N,11749.3064,W,2,04,3.93,24.8,M,-34.2,M,0000,0000*65
$GPGSA,A,3,13,17,28,19,,,,,,,,,4.05,3.93,0.99*0C
$GPRMC,052731.000,A,3343.3943,N,11749.3064,W,0.84,313.46,240117,,,D*74
Lets take a look at this data, because it’s kind of cool:
- Sentance Identifier
- $GPGGA: Global Positioning System Fix Data
- Time
- 052731.000: hhmmss.sss
- Latitude
- 3343.3943,N: Latitude, North/South
- Longitude:
- 11749.3064,W: Longitude, East/West
- Fix Quality
- 2: 0 = Invalid, 1 = GPS fix, 2 = DGPS fix
- Number of Satellites
- 04: 4 here, mine at home can “see” 10
- Horizontal Dilution of Precision
- 3.93: 1 = Ideal, 1 - 2 = Excellent, 2 - 5 = Good, 5 - 10 = Moderate, 10 - 20 = Fair, >20 = Poor
- Altitude
- 24.8,M: meters, like it should be
- Height of Geoid Aboive WGS84 Ellipsoid
- -34.2,M: meters again
- Time since last DGPS update
- 0000: I have only seen this as 0000
- DGPS reference station id
- 0000: no station id, again I have never seen this anything but 0000
- Checksum
- *65: I’m not sure how this is calculated
There are a bunch of other messages, so I would recommend going here to dig through what the other messages mean.
Back to the system. There is also a PPS device available, and if you’re lucky enough to be on Linux, you can use pps-tools like ppstest:
ppstest /dev/pps0
trying PPS source "/dev/pps0"
found PPS source "/dev/pps0"
ok, found 1 source(s), now start fetching data...
source 0 - assert 1586749906.999999821, sequence: 19999 - clear  0.000000000, sequence: 0
source 0 - assert 1586749907.999999866, sequence: 20000 - clear  0.000000000, sequence: 0
source 0 - assert 1586749909.000001057, sequence: 20001 - clear  0.000000000, sequence: 0
Those are very precise epoch timestamps
These tools are written in C, but they have some linux specific headers that I’m not 100% sure how to work around so it can compile on FreeBSD
So, now that we have verified we’re getting valid GPS data, and a PPS signal, we can fire up gpsd.
I had to change the service defaults for GPSD so it would correctly connect to the GPS hat:
$ cat /etc/default/gpsd# Default settings for the gpsd init script and the hotplug wrapper.
# Start the gpsd daemon automatically at boot time
START_DAEMON="true"
# Use USB hotplugging to add new USB devices automatically to the daemon
USBAUTO="false"
# Devices gpsd should collect to at boot time.
# They need to be read/writeable, either by user gpsd or the group dialout.
DEVICES="/dev/serial0 /dev/pps0"
# Other options you want to pass to gpsd
GPSD_OPTIONS="-n"start/restart the service:
$ systemctl restart gpsdThen use gpsmon if you want to see it all working:
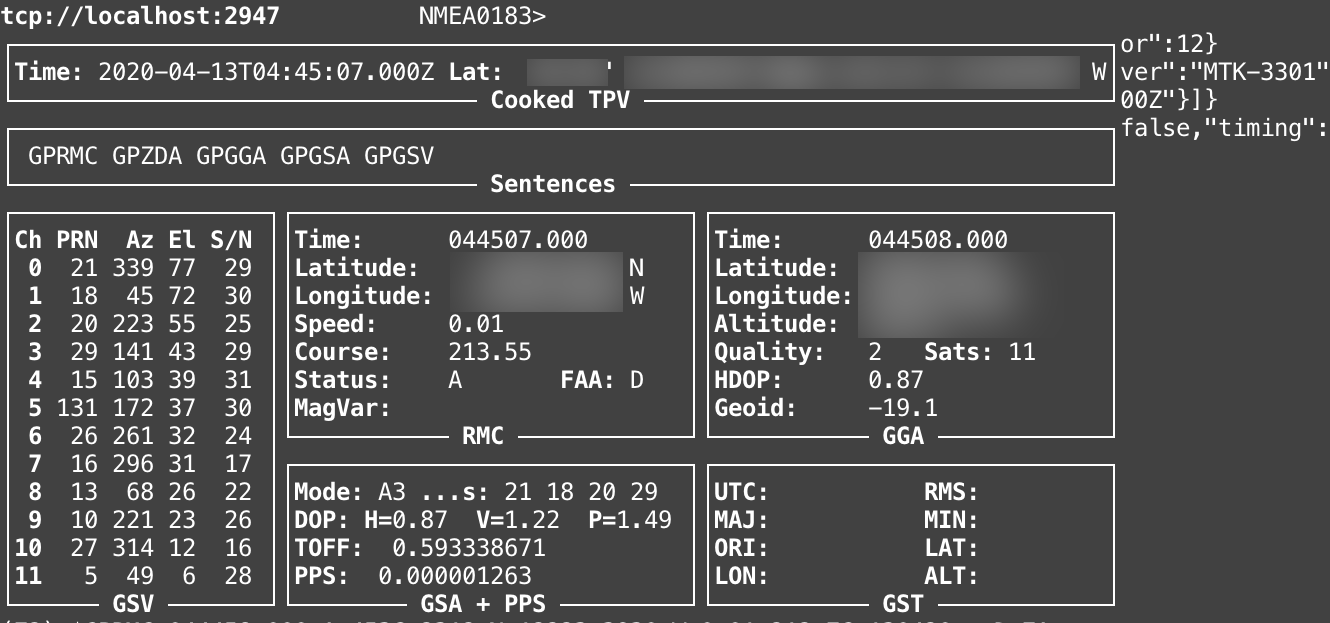
I'm easy to find, but I'm not giving out my EXACT location
┌───────────────────────────────────────────┐┌─────────────────────────────────┐
│    Time:       2020-04-13T04:45:24.000Z   ││PRN:   Elev:  Azim:  SNR:  Used: │
│    Latitude:    xx.60385333 N             ││   5    06    049    28      Y   │
│    Longitude:  xxx.38988333 W             ││  10    23    221    27      Y   │
│    Altitude:   xxx.300 m                  ││  13    26    068    26      Y   │
│    Speed:      0.04 kph                   ││  15    39    102    30      Y   │
│    Heading:    177.7 deg (true)           ││  16    31    296    19      Y   │
│    Climb:      0.00 m/min                 ││  18    72    045    32      Y   │
│    Status:     3D DIFF FIX (10 secs)      ││  20    55    223    25      Y   │
│    Longitude Err:   +/- 1 m               ││  21    77    340    29      Y   │
│    Latitude Err:    +/- 2 m               ││  26    32    261    25      Y   │
│    Altitude Err:    +/- 7 m               ││  27    12    314    15      Y   │
│    Course Err:      n/a                   ││  29    43    141    28      Y   │
│    Speed Err:       +/- 19 kph            ││ 131    37    172    30      N   │
│    Time offset:     1.001                 ││                                 │
│    Grid Square:     CN85to                ││                                 │
└───────────────────────────────────────────┘└─────────────────────────────────┘
FreeBSD Setup
Sadly, I could only get so far until I hit a snag. It was not entirely unsuccessful and still worth documenting.
Similar to Rasbian, we need to tell FreeBSD that pin 4 on the GPIO is a PPS device, and, there is a gps serial “console” and we don’t want the OS to bring it up as a login terminal.
First you need to make a device tree source overlay file:
/dts-v1/;
/plugin/;

/ {
        compatible = "brcm,bcm2708";
        fragment@0 {
                target-path = "/";
                __overlay__ {
                        pps@0 {
                                compatible = "pps-gpio";
                                gpios = <&gpio 4 0>;
                                status = "okay";
                        };
                };
        };
};
Then, compile it:
dtc -@ -o ~/pps.dtbo ~/pps.dtsAnd update /boot/loader.conf to ensure it is loaded at boot time:
gpiopps_load="YES"
fdt_overlays="pps"
boot_multicons="NO"
boot_serial="NO"
console="vidconsole"
We’re also telling FreeBSD to not use a serial console at the boot loader.
/boot/msdos/config.txt also needs to be updated (this seems to be a config file that u-boot looks for)
arm_control=0x200
dtparam=audio=on,i2c_arm=on,spi=on
dtoverlay=mmc
dtoverlay=pwm
#dtoverlay=pi3-disable-bt
device_tree_address=0x4000
kernel=u-boot.bin
enable_uart=1
enable_uart=1 is what we need.
Booting, and its issues
I was not successful in re-compiling u-boot from ports, and setting stdout, stderr and stdin to non serial devices.
Something like this patch:
--- include/configs/rpi.h.orig	2017-10-16 17:46:46 UTC
+++ include/configs/rpi.h
@@ -103,10 +103,21 @@

 /* Environment */
 #define CONFIG_ENV_VARS_UBOOT_RUNTIME_CONFIG
+#ifdef	CONFIG_SILENT_CONSOLE
+#define	CONFIG_SYS_DEVICE_NULLDEV
+#define	CONFIG_SILENT_CONSOLE_UPDATE_ON_RELOC
+#define	CONFIG_SILENT_CONSOLE_UPDATE_ON_SET
+#define	ENV_DEVICE_SETTINGS \
+	"stdin=usbkbd\0" \
+	"stdout=vidconsole\0" \
+	"stderr=vidconsole\0"\
+	"silent=1\0"
+#else
 #define ENV_DEVICE_SETTINGS \
 	"stdin=serial,usbkbd\0" \
 	"stdout=serial,vidconsole\0" \
 	"stderr=serial,vidconsole\0"
+#endif

 /*
  * Memory layout for where various images get loaded by boot scripts:
So, what I had to do is:
- unplug the hat when I rebooted the Pi
- connect to the hdmi and have a usb keyboard ready
- interrupt the boot process
- type:
U-Boot> setenv stdout vidconsole
U-Boot> setenv stderr vidconsole
U-Boot> setenv stdin usbkbd
U-Boot> boot
Anyway, once the system has been rebooted, a pps device and two UART devices will be available:
$ dmesg | grep '(uart|pps)'
uart0: <PrimeCell UART (PL011)> mem 0x7e201000-0x7e201fff irq 25 on simplebus0
uart1: <BCM2835 Mini-UART> mem 0x7e215040-0x7e21507f irq 33 on simplebus0
gpiopps0: <GPIO PPS> on ofwbus0
gpiopps0: PPS input on gpio0 pin 4
The last place that really stumped me, and it honestly should have been easy to solve, was the tty settings on the gps serial device.
$ stty -f /dev/cuau1.init raw 9600 cs8 clocal -cstopb

$ stty -f /dev/cuau1
speed 9600 baud;
lflags: -icanon -isig -iexten -echo echoke echoctl
iflags: -icrnl -ixon -imaxbel ignbrk -brkint
oflags: -opost tab0
cflags: cs8 -parenb clocal
I attempted the same stty setup, but the data coming from the GPS wasn’t usable beause of missing or overrun new lines. So, gpsd couldn’t properly use /dev/cuau1
The PPS device seemed to work though, chrony and ntp were able to use it:
MS Name/IP address         Stratum Poll Reach LastRx Last sample
===============================================================================
#? NEMA                          0   4     0     -     +0ns[   +0ns] +/-    0ns
#? NEMA                          0   4     0     -     +0ns[   +0ns] +/-    0ns
#* PPS                           9   4     7    22   +105ns[ -961ns] +/-  334ns
#? SOCK                          0   4     0     -     +0ns[   +0ns] +/-    0ns
Chrony Config
Chrony can use a NMEA and PPS device, and the setup is pretty easy:
refclock SHM 0 delay 0.5 refid NMEA
refclock SHM 1 offset 0.0 delay 0.1 refid NMEA
refclock PPS /dev/pps0 refid PPS
refclock SOCK /var/run/chrony.ttyS0.sock delay 0.0 refid SOCK
logchange 0.5
local stratum 10
SHM 0 is the NMEA data at 4800bps, so I’ll probably just remove it as its not considered fast enough for accuracy SHM 1, from gpsd running, is from the pps_ldisc kernel module that is loaded:
lsmod|grep pps
pps_ldisc              16384  1
pps_gpio               16384  2
pps_core               20480  4 pps_gpio,pps_ldisc
It is much better as it includes PPS data and is accurate to a few nanoseconds
PPS is from /dev/pps0 only, not horrible, and on FreeBSD this was the only source I could get working.
It can take a while for the GPS and PPS devices to settle, but you can verify with chronyc:
$ chronyc tracking
Reference ID    : 50505300 (PPS)
Stratum         : 1
Ref time (UTC)  : Tue Apr 14 02:39:41 2020
System time     : 0.000000018 seconds fast of NTP time
Last offset     : -0.000000003 seconds
RMS offset      : 0.000000208 seconds
Frequency       : 8.825 ppm fast
Residual freq   : -0.000 ppm
Skew            : 0.002 ppm
Root delay      : 0.000000001 seconds
Root dispersion : 0.000010701 seconds
Update interval : 16.0 seconds
Leap status     : Normal
$ chronyc sources
210 Number of sources = 8
MS Name/IP address Stratum Poll Reach LastRx Last sample
===============================================================================
#x NMEA 0 4 377 15 +510ms[ +510ms] +/- 256ms
#? NMEA 0 4 0 - +0ns[ +0ns] +/- 0ns
#* PPS 0 4 377 14 -8ns[ -11ns] +/- 208ns
#? SOCK 0 4 0 - +0ns[ +0ns] +/- 0ns
^- 5.20.0.21 2 10 377 38m -267us[ -305us] +/- 113ms
^- titan.crash-override.org 2 10 377 612 -3022us[-3024us] +/- 36ms
^- lax1.justaguy.be 2 10 377 41m -5609us[-5649us] +/- 103ms
^- 72.249.38.88 2 10 377 926 +5181us[+5175us] +/- 98ms